
This post may include affiliate links; see our disclosure policy.
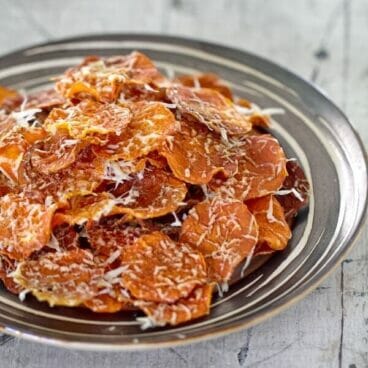
Ready in 30 minutes, these baked butternut squash chips are delightfully crunchy. The sweet squash pairs nicely with salty Parmesan and is a great snack!

For me, most cooking falls into two categories: quick-and-easy versus food projects. Most of the time, we focus on the quick-and-easy (but still delicious and healthy!) recipes. But sometimes you just want to slow down, enjoy the process, and end up with a delicious and unique treat.
To us, food projects are things like homemade pasta or pickles – activities to pass the time on a weekend or an evening with loved ones. These butternut squash chips fall right into that category, and would be especially great for making with kids! We picked up a few butternut squashes from the farmer’s market that happened to have the perfect long thin necks for making chips.

How to make butternut squash chips
As I just mentioned, making these butternut squash chips is infinitely easier when you have squashes with long necks. This recipe uses just the necks, so really try and find the perfect squash for this recipe! To make butternut squash chips, you’ll first need to cut the neck of the squash off (save the rest for another recipe!) and then peel it. Then, you need to slice the squash very thinly using a mandoline. If you don’t have a mandoline, a sharp butcher’s knife will work—just be careful!
Once sliced, drop the squash slices into boiling water for a few minutes. This cooks the squash slightly and helps it crisp up more in the oven. Drain and rinse the slices, then pat dry and lay out on a parchment paper-lined baking tray. Brush each squash slice with some olive oil, and then sprinkle with kosher salt and Parmesan cheese. Once topped with cheese, the squash is ready to bake! Baking times may vary depending on your oven, so watch your first batch of squash chips like a hawk. Once the chips have browned, they’re ready to come out of the oven.

The sweetness of the squash balances perfectly with a little bit of grated Parmesan. These butternut squash chips are a great treat, and if you hold yourself back, you can get a couple days worth of lunches out of a batch. Though, being baked and homemade, feel free to eat as many as you like!
Thanks to Homestead Growers for the butternut squash!
Looking for more butternut squash recipes?
Here are some of our favorite butternut squash recipes on A Couple Cooks:
- Creamy Butternut Squash Risotto
- Butternut Squash Pasta
- Cozy Curried Butternut Squash Soup
- Easy Instant Pot Butternut Squash Soup
- Roasted Butternut Squash
- Healthy Butternut Squash Recipe
- Healthy Butternut Squash Lentil Soup
- Vegan Butternut Squash Soup
- Butternut Squash Mac and Cheese
- Easy Butternut Squash Soup
This butternut squash chips recipe is…
Vegetarian and gluten-free.
Baked Butternut Squash Chips
Ready in 30 minutes, these baked butternut squash chips are delightfully crunchy. The sweet squash pairs nicely with salty Parmesan and is a great snack!
- Prep Time: 10 minutes
- Cook Time: 20 minutes
- Total Time: 30 minutes
- Yield: 4 1x
- Category: Snack
- Method: Baked
- Cuisine: American
Ingredients
- 2 butternut squashes with long necks
- Parmesan cheese
- Olive oil
- Kosher salt
Instructions
- Preheat the oven to 375°F. Bring a large pot of salted water to a boil.
- Cut the necks of the squashes off of the bases, and peel each neck. Using a sharp knife or mandoline, slice each squash into thin slices, about 1/8th of an inch thick.
- Drop the slices into the boiling water and boil for 2 minutes (this allows the squash to become crispy when baked). After 2 minutes, carefully drain and rinse the slices until they are cool to the touch. Pat the slices dry with a towel to remove excess water.
- Cover two baking sheets with parchment paper and place the slices on top, taking care that the slices do not touch. Brush the slices with a bit of olive oil, sprinkle with kosher salt, and top with finely grated Parmesan cheese.
- Bake the chips until crispy, about 15-20 minutes. Watch carefully and remove the chips once they turn brown and crispy – the timing for your oven may be shorter or longer. You may need to remove the chips in intervals, depending on the evenness of the slice thickness and oven heat. (Alternatively, you can microwave the chips; each batch takes about 10 minutes on high power.)
- Once cooled, store the chips in an airtight container for up to one week.


Cool idea! unfortunately I’ve eaten all the butternuts our garden produced last year, but I’ve bookmarked this page. Will definitely try this out. I can imagine it’s great, and the many positive reviewers who tried it seem to agree )) Thank you for a great idea and the instructions.
Love the chips! Do you refrigerate the chips after baking or leave them out?
We leave them room temp in covered container.
What a great recipe and so easy to prepare! By the way, they aren’t not only a delicious treat on the sofa while watching TV. I made a big portion of them to share with my Spanish friends this weekend when hiking in the mountains of Mallorca. These light crisps are just as well a perfect snack to satisfy hunger on the way.
Everybody was surprised how yummy they were and wanted me to pass them the recipe by Whatsapp during our rest. So did I.
I also recommended them to have a look at your wonderful website. Surely you’ll get some new followers from Spain soon.
Thank you so much for all your splendid and original ideas.
I love butternut squash in the fall but as many ways as I have tried it, I have never tried or heard of butternut squash chips! I love to try new things so I can’t wait to try this recipe. I recently tried beet chips and I was blown away by how good they were so I bet the same thing happens here. I love that they are baked and not fried. Pinning now to try soon!
I just saw a recipe that said it takes NINE HOURS to make! Cook them on 200° for 3 hours then let cool for 6. Is this woman from
Mars or something? Who in their right mind would spend 9 hours making
These? Lmao. 30 min is more my style!
They look awesome. I need to get a mandolin. What model mandolin did you use to make these chips? Thank you.