Easy Sourdough Bread Recipe (Really!)
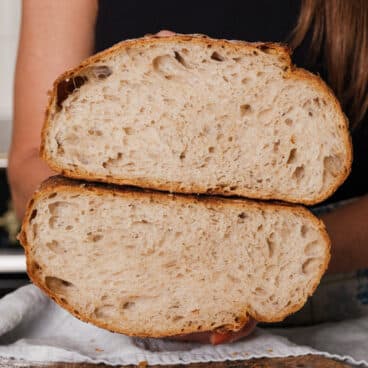
This easy sourdough bread recipe is foolproof for beginners and so much easier than most loaves! It comes out with the perfect chewy crust and tender crumb.
- Prep Time: 6 hours
- Rest Time: 12 to 18 hours
- Cook Time: 40 minutes
- Total Time: 0 hours
- Yield: 1 loaf (about 12 slices) 1x
- Category: Bread
- Method: Baked
- Cuisine: American
- Diet: Mediterranean Diet, Vegan, Vegetarian
Ingredients
- 100 grams ripe sourdough starter (100% hydration), at its peak
- 315 grams warm water
- 12 grams kosher salt
- 10 grams olive oil
- 10 grams honey (or agave syrup for vegan)
- 350 grams bread flour
- 75 grams whole wheat flour
- 50/50 gluten-free flour, optional, for dusting
Instructions
Day 1 (5 to 6 hours, mostly hands off)
Before you start, make sure your sourdough starter is at its peak; see How to Feed a Starter.
- Mix the dough and rest 1 hour: In a large bowl, stir together the sourdough starter, warm water, honey, olive oil and salt. Add the whole wheat flour and bread flour, then stir until a shaggy dough forms. Cover and rest 1 hour.
- Stretch 1 and rest 1 hour: With wet hands, grab one edge of the dough, stretch it up, and fold it over the center. Rotate the bowl and repeat until you’ve worked your way around the dough. Pick up the dough and continue stretching and folding, several more times until a tight boule is formed. (See the video for how to fold the dough.) Place back in the bowl, cover with plastic (or I use a reusable shower cap!) and rest 1 hour.
- Stretch 2 and rest 1 hour: With wet hands, grab one edge of the dough, stretch it up, and fold it over the center. Rotate the bowl and repeat until you’ve worked your way around the dough. Pick up the dough and continue stretching and folding, several more times until a tight boule is formed. (See the video for how to fold the dough.) Place back in the bowl, cover and rest 1 hour.
- Stretch 3 and rest 2 to 3 hours: With wet hands, grab one edge of the dough, stretch it up, and fold it over the center. Rotate the bowl and repeat until you’ve worked your way around the dough. Pick up the dough and continue stretching and folding, several more times until a tight boule is formed. Place back in the bowl, cover. Rest 2 to 3 hours, until doubled in size and very jiggly on top when the bowl is shaken. (See the video for what it should look like.)
- Shape the bread: Prepare a counter lightly dusted with flour. Prepare a banneton dusted with flour or 50/50 GF flour. Carefully scrape the dough onto the counter. Gently stretch each corner up and over the center to form a packet, then flip the dough over and place your hands behind the dough and gently pull the dough towards you to increase the tension on the surface of the dough. Rotate and repeat until you have a tight boule shape. Carefully flip into the banneton (the dough will stretch to fill the banneton as it rests).
- Cold ferment 12 hours: Cover the banneton and refrigerate overnight, 12-18 hours.
Day 2 (30 minutes preheat + 40 minute bake)
- Preheat the Dutch oven: When ready to bake, position a rack in the center of the oven. Place a Dutch oven with lid on in the oven, and preheat the oven to 515°F for at least 30 minutes.
- Bake 17 minutes in Dutch oven: Once preheated, prepare a square of parchment on the counter, along with an ice cube and lame or sharp knife. Remove the banneton from the fridge, and gently flip the bread onto the parchment paper. Use a sharp knife to cut a long 1/2-inch deep slit at a slight angle across the top of the bread. Remove the lid from the preheated Dutch oven and carefully pick up the parchment paper and drop the boule into the Dutch oven. Drop the ice cube into the side of the dutch oven, then quickly place the lid on and bake for 17 minutes.
- Reduce heat and bake 22-24 minutes on rack: After 17 minutes, reduce the heat to 400F. Remove the dutch oven from the oven. Carefully lift bread out and place it directly on the oven rack and bake for 22-24 minutes until the bread is a dark golden brown and the internal temperature is at least 205°F [95°C] when measured with a food thermometer.
- Cool: Remove the bread from the oven and place it on a baking rack until fully cool, about 1 hour (don’t cut it while warm or it will become gummy). After cooling, the bread is ready to eat. Store the bread wrapped in cloth or in a bread bag on the counter for up to 2 days, or slice and freeze wrapped in foil in a plastic bag for 3 months. Toast slices directly from frozen. Do not store the bread in plastic, or it will lose its texture.
Notes
Flour substitutions: Bread flour is essential in this recipe; don’t substitute it with more all-purpose flour.
Banneton alternatives: If you don’t have a banneton, you can proof the dough in a bowl lined with a well-floured tea towel.
Hydration level: This is a 77% hydration dough, which creates that nice balance of manageable handling with good open crumb.
Timing flexibility: If you need to adjust the schedule, you can leave the dough in the refrigerator for up to 18 hours (longer than that and it may overproof). You can also feed your starter earlier or later: just make sure it’s at peak activity (bubbly and doubled) before using it.
Find it online: https://www.acouplecooks.com/easy-sourdough-bread-recipe/